This can be useful for lots of reasons, but if you are a system administrator, that has a dual monitor and would like to remote desktop, multiple monitors, it is very easy (Depending on the OS on the Host and Client PC).
How to Setup
You want to make sure that Windows is detecting your second screen, if it’s just black or gives you the prompt Didn’t detect another display, you will have to troubleshoot that first.
So, I am assuming that you have the following setup:
- You have a computer in a remote location that has two monitors connected to it
- Have dual monitor setup at home (or wherever you are trying to connect to the remote computer from)
- You are trying to remotely connect to the remote computer using RDP client and use both of your monitors as you would on your local computer
1. Remote Desktop Dual Monitors In Windows 10
Once you are sure that the remote computer supports multiple monitors in an RDP connection, let’s see how it is done.
Using this method you will use two monitors for the remote desktop session. The remote session will automatically expand to both of your screens.
- Go to “Start” or press the Windows key on your keyboard
- Search for “RDS” or simply type in “Remote Desktop Connection”
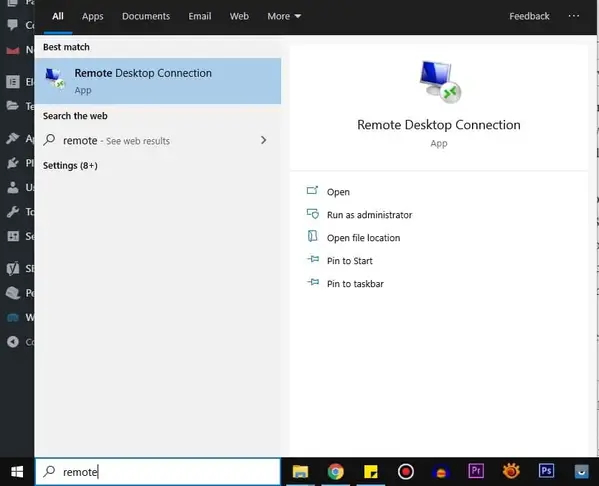
- Hit the enter key and this will take you to the remote desktop connection application
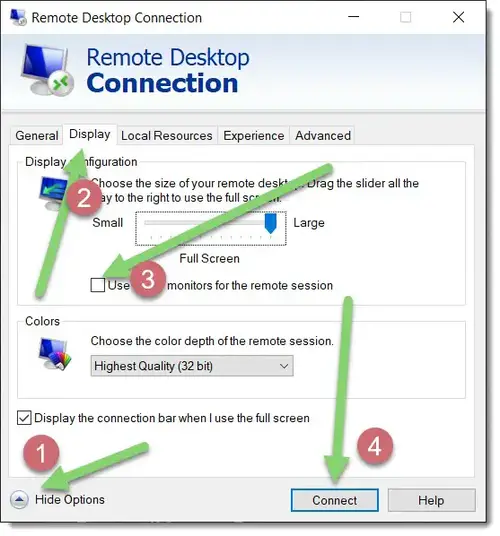
- Enter the computer’s name or the IP address, but before you press the “Connect” button, click on the “Show Options” button.
- Now a new window opens up with a bunch of different options like General, Display, Local Resources, Experience, Advanced
- Click on the “Display” tab and tick the “Use all my monitors for the remote session”.
- Now if you connect to the pc and go full screen, this will use both of your computer’s monitors
So, that’s how you can use dual monitors in a remote desktop session.
Remote Desktop Multiple Monitors In Windows 10: 3+ Monitors
What to do if you have more than two monitors and would like to manage your workspace differently? There are applications that might help you achieve this, but with the trick mentioned below, you might want to uninstall that clanky windows 10 app you’ve been using.
If you have a triple monitor setup and only want to use two monitors for remote desktop and the third one for your local system. That is easily achievable as well. If you would like to learn how to setup dual monitors in windows 10 locally, that process is a little different.
You can also alter the setting if you have a dual monitor setup. I personally use my second monitor for the remote desktop connection and leave the main monitor for my local PC.
Before we start to change the settings as we prefer, we need to know how your system detects these monitors.
- Go to Start and type “RUN” or hit the “Windows” + “R” key together. This will bring up the Run application
- Type in mstsc /l and hit enter
- You will see a dialog box with all the monitors connected to the system represented by a number
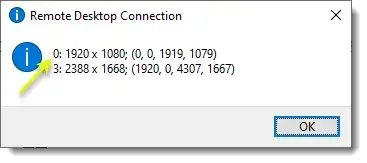
- In the above screenshot, 0 is my main monitor and 3 is my second monitor.
- Right-click on the desktop and open display settings
This part might be tricky if you have more than two monitors. We now will try to exactly match the numbers to which monitor they represent.
Lowest number on the RDP = Lowest number on the display settings.
Let me explain.
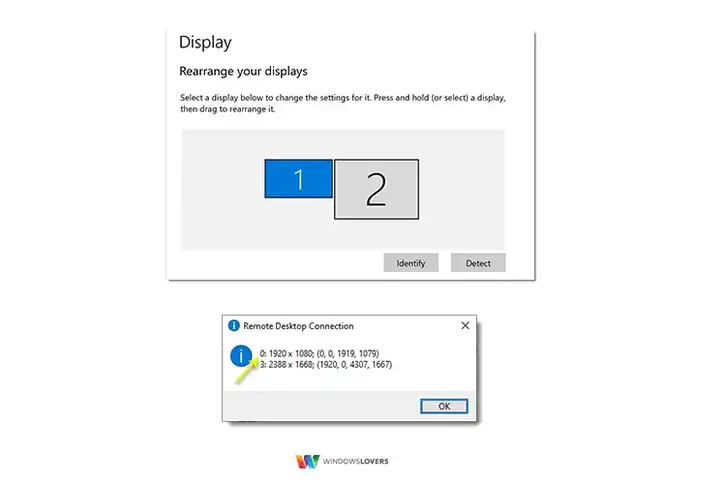
In the screenshot above 0 is 1, and 3 is 2.
Once this is sorted, we can begin arranging the remote desktop settings the way you prefer.
- Click on Start and search for “Remote Desktop Connection” and open the Remote Desktop Connection app. Alternatively, hit the Windows + R key together on the keyboard to bring up the run, type mstsc, and hit Enter.
- Type in the Computer name or the IP address that you want to connect remotely
- Click on “Show Options”, click on the Display tab, make sure you check the “Use all my monitors for the remote session”
- Go back to the “General” tab, click on “Save As…” and save it in a location that you can remember later on
Use two monitors for Remote Desktop Connection and third one locally
If you have more than two monitors, want to use two for remote desktop and the rest for local use, let’s see how it’s done. You can use this trick to split screen on remote desktop in Windows 10
Running multiple monitors on a system is quite heavy task, and if your system is laggy you might want to look into ways to improve the performance of your system.
- Open notepad application. Open the start menu and type in “notepad”
- File open > Select all file types > Open the remote desktop connection profile we saved in previous steps
- This opens the file and you can see a bunch of text. Scroll to the top and type in the following command.
selectedmonitors:s:a,b,c
This should be added to the top of the file and not towards the bottom.
a,b,c – Depending on which monitors you would like to use for the remote desktop connection, replace these with the numbers for the monitors that we found using the mstsc /l command.
That is how to use multiple monitors for remote desktop connection and select specific monitors that you would like to use for the Remote desktop connection.
One thing that I would suggest though, is saving this connection setting to an RDP file so that you can just load it every time you use it.
To do this,
- Once you have selected the “Use all my monitors for the remote session” option, go back to the General tab.
- Now on the bottom, you should see “Connection Settings”, Click on “Save” to save this new connection setting or you can “Open” a previously saved remote connection profile settings.
That’s it, folks. Let me know if you guys have any more issues to use dual monitors or remote desktop multiple monitors Windows 10 setup.